

Hamstring flexibility affects every movement, from walking to bending. Many struggle with tight hamstrings, leading to daily discomfort and limited movement. Research shows that improving hamstring flexibility involves specific adaptations in both muscles and nerves (signals from the brain to muscles).
The hamstrings contain three distinct muscles that cross the hip and knee joints. This arrangement influences everyday movements, including walking, running, and maintaining posture. These muscles adapt to stretching through precise changes in physical structure and nervous system responses.
Tight hamstrings create a pattern of movement changes throughout the body. When these muscles lack proper mobility, they can alter pelvic position, increase lower back stress, and change other muscles’ functions. This connection highlights why hamstring mobility influences overall movement quality.
Studies reveal fresh insights about muscle stretching. The body’s response to flexibility training follows clear patterns, with changes occurring in specific timeframes. These findings reshape our approach to mobility improvement.
The sections below provide practical methods for measuring and enhancing hamstring mobility. You’ll discover how muscles adapt and respond to regular stretching operations through proven techniques and clear explanations.
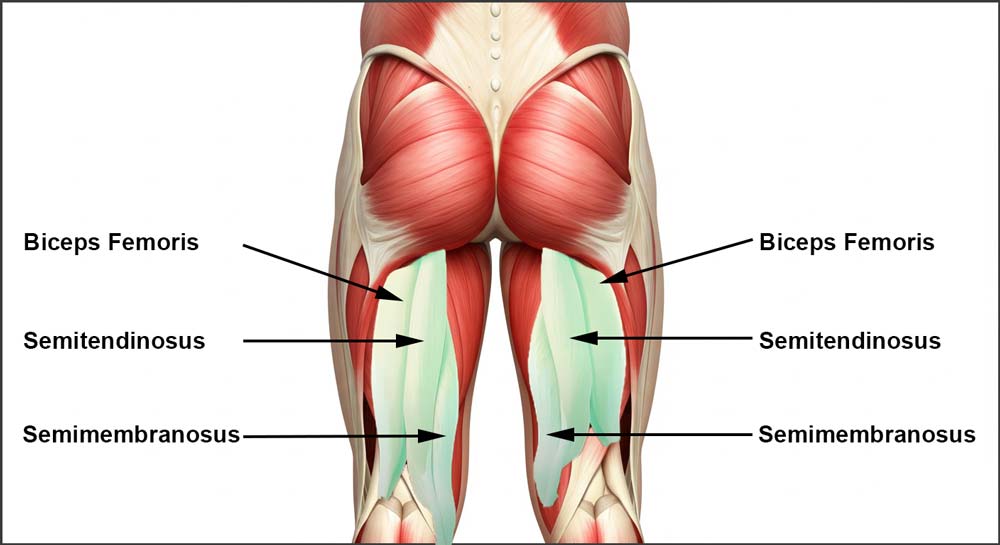
The Three Muscles That Control Movement
The back of your thigh houses the powerful hamstring muscles, working together to control leg movement. As shown in the image above, these muscles attach from your sitting bones to your lower leg. Each muscle contributes uniquely to movement, allowing you to bend your knee, extend your hip, and stabilise your pelvis.
Your hamstring flexibility depends on how these muscles work as a team. They cross two joints – the hip and knee – making them vital for everyday activities. This design allows the hamstrings to control movement in multiple directions and makes them prone to tightness.
Biceps Femoris
The most significant hamstring muscle splits into two parts as it travels down your leg. It controls the outward rotation of your leg when the knee bends and helps extend the hip when standing. This muscle often experiences the most tension during forward bending.
The unique structure of the biceps femoris makes it exceptionally responsive to stretching. Its position on the outer part of your thigh means it plays a crucial role in stabilising the knee during walking and running.
Semitendinosus
Located on the inner part of your thigh, this long, rope-like muscle helps rotate your leg inward when your knee bends. It works closely with your other hamstring muscles to control hip and knee movements while climbing stairs.
The semitendinosus has the longest fibres of all hamstring muscles, giving it excellent potential for lengthening. This muscle often responds well to stretching exercises, particularly those targeting the inner thigh.
Semimembranosus
This deep hamstring muscle lies beneath the semitendinosus. It has a flat, membrane-like appearance and is vital to knee stability. The semimembranosus helps protect your knee joint during movements that involve both hip and knee action.
How Hamstring Flexibility Changes
When you first start stretching, your body responds in two distinct ways. Initial gains in hamstring flexibility happen quickly through nervous system changes. At the same time, lasting improvements take time as your muscles physically adapt.
The nervous system’s role involves specialised sensors within your muscles called muscle spindles. These tiny structures detect stretch and initially resist it. With regular practice, these sensors become less sensitive, allowing greater ranges of movement before triggering protective responses.
Physical changes in hamstring flexibility occur in several ways. Your muscle fibres contain the smallest units called sarcomeres, which can add new sections in response to stretching, similar to adding new links to a chain. This process requires consistent practice over several weeks.
Studies reveal specific timeframes for these adaptations. The initial nervous system changes can occur within a single stretching session. At the same time, physical muscle adaptations typically need at least three weeks of regular practice. However, these limits can vary based on individual factors.
Flexibility improvements follow a clear pattern. The first 15 seconds of stretching produce over 60% of the immediate change in muscle tension. For lasting results, research shows that stretching sessions should last between 180 and 300 seconds to create meaningful adaptations.
Temperature affects how muscles respond to stretching. Proper warming of tissues improves their ability to lengthen safely, which explains why stretching feels easier after light activity than in cold muscles.
Assessing Your Range of Motion
Measuring hamstring flexibility provides valuable information about your mobility. The sit-and-reach test offers a simple way to assess your current level and track improvements over time. While professional assessment tools exist, you can perform reliable measurements at home with basic equipment.
Your age and daily activities influence hamstring flexibility measurements. Regular assessment helps identify areas needing attention and guides your stretching routine. The sit-and-reach test works for people of all ages, with variations available for different mobility levels.
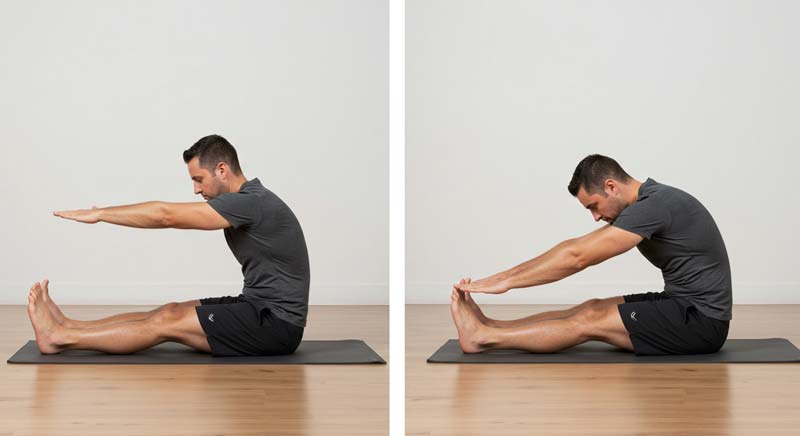
Standard Sit-and-Reach Test
This traditional assessment method suits most adults and provides reliable measurements of hamstring mobility. The test requires minimal equipment and can be performed at home with accurate results.
- Place a measuring tape on the floor and mark the 38cm point with tape
- Sit with legs straight, feet 15cm apart, heels at the marked point
- Remove shoes and maintain straight knees without locking them
- Place hands parallel to each other, palms facing down
- Reach forward slowly without bouncing
- Hold the position for 2 seconds
- Record the distance reached by your fingertips
- Take two attempts and use your best score
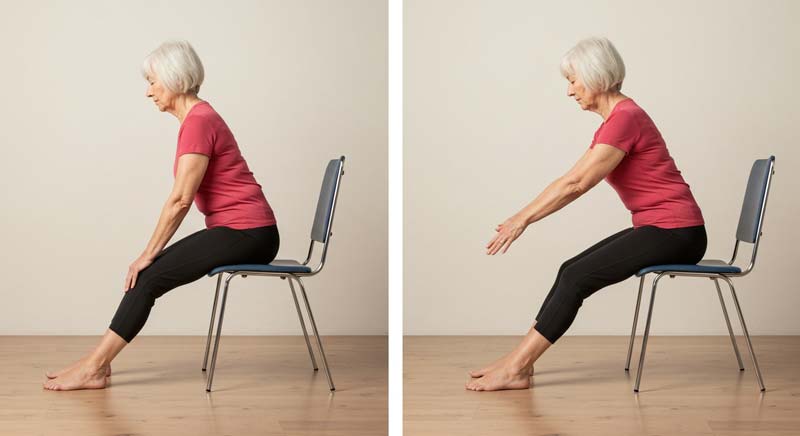
Chair Sit-and-Reach Test
This variation is designed for older adults or those with limited mobility. It provides accurate assessment while maintaining comfort and safety. The chair test eliminates the need to get up and down from the floor.
- Position a sturdy chair against a wall
- Sit at the chair’s front edge
- Extend one leg with the heel on the floor, foot flexed
- Bend the other leg with the foot flat on the floor
- Reach toward toes with hands overlapped
- Keep back straight during the reach
- Measure distance from fingertips to toes
- Test both sides and record each measurement
- A positive score means reaching past the toes
- A negative score indicates distance before the toes
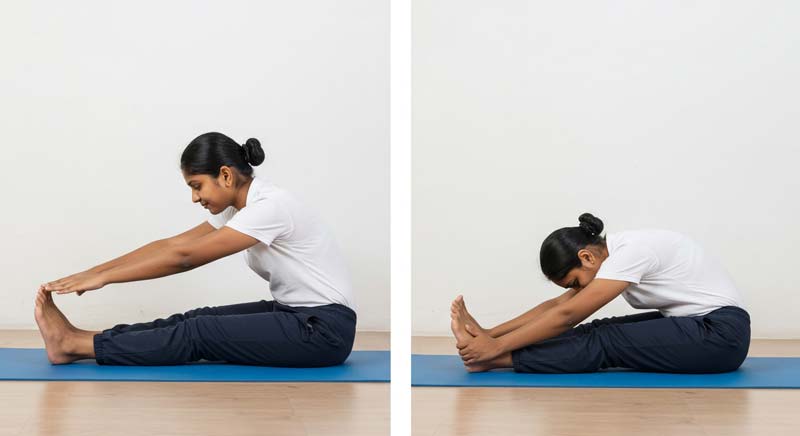
Youth Sit-and-Reach Test
This modified version accommodates children aged 5-17, accounting for their different body proportions and flexibility patterns. The test helps identify early mobility patterns and potential imbalances.
- Place a 30cm-high box against a wall
- Extend measuring tape with zero at the box edge
- Press one foot against the box
- Keep the other foot flat beside the straight leg
- Maintain a straight back and level head
- Reach forward with both hands
- Record the distance for each leg separately
- Complete three attempts per side
- Use the best score for each leg
- Compare sides to check for imbalances
Sit-and-Reach Test: Age and Sex Flexibility Categories
| Category | 20-29 yrs | 30-39 yrs | 40-49 yrs | 50-59 yrs | 60-69 yrs | |||||
|---|---|---|---|---|---|---|---|---|---|---|
| Sex | M | W | M | W | M | W | M | W | M | W |
| Excellent | ≥40 | ≥41 | ≥38 | ≥41 | ≥35 | ≥38 | ≥35 | ≥39 | ≥33 | ≥35 |
| Very good | 34-39 | 37-40 | 33-37 | 36-40 | 29-34 | 34-37 | 28-34 | 33-38 | 25-32 | 31-34 |
| Good | 30-33 | 33-36 | 28-32 | 32-35 | 24-28 | 30-33 | 24-27 | 30-32 | 20-24 | 27-30 |
| Fair | 25-29 | 28-32 | 23-27 | 27-31 | 18-23 | 25-29 | 16-23 | 25-29 | 15-19 | 23-26 |
| Poor | ≤24 | ≤27 | ≤22 | ≤26 | ≤17 | ≤24 | ≤15 | ≤24 | ≤14 | ≤22 |
Improving Hamstring Flexibility
Making lasting improvements in hamstring flexibility requires attention to specific training principles. Research shows that short stretching sessions offer temporary gains, while meaningful changes demand consistent practice.
The first 15 seconds of stretching reduce tension by over 60%, yet lasting tissue adaptation requires longer engagement.
Time plays a crucial role in hamstring flexibility gains. Studies reveal that holding stretches for 180 seconds or more triggers meaningful tissue changes. This duration allows muscle fibres to adapt and improves the range of motion. The body responds differently to various stretch durations, with longer holds promoting better adaptation.
Tissue temperature affects stretching results. Cold muscles resist quick stretching movements, often creating the opposite effect of what you want. Light activity before stretching helps warm tissues and improves their ability to lengthen safely. This explains why stretching feels easier after gentle movement.
Your nervous system’s response shapes flexibility gains. The first phase of improvement comes from reduced protective tension in your muscles. This quick adaptation explains why you might feel more flexible after just one session. However, actual tissue changes take more time.
Key principles for effective stretching:
- Hold positions for 180-300 seconds to promote tissue adaptation
- Perform stretching 3-4 times weekly for consistent gains
- Stay within ranges that feel comfortable without bouncing
- Breathe slowly through your nose to reduce muscle tension
- Warm up with light movement before stretching
- Exit stretches gradually to protect your lower back
The intensity of your stretch affects adaptation speed. Standard stretching at normal tension requires longer holds, while higher-intensity stretching can create changes more quickly. However, higher intensity requires careful progression to avoid triggering protective responses.
Morning and evening flexibility often differ. Your body naturally stiffens overnight as part of normal biological rhythms. This variation explains why you might feel tighter in the morning. Regular stretching helps minimise these daily fluctuations.
Sources
- Bennett HJ, Rider PM, Domire ZJ, DeVita P, Kulas AS. Heterogeneous fascicle behavior within the biceps femoris long head at different muscle activation levels. J Biomech. 2014;47:3050–3055.
- Canadian Society for Exercise Physiology — Physical Activity Training for Health (CSEP-PATH) Resource Manual. Ottawa (Canada): Canadian Society for Exercise Physiology; 2013.
- De-Doncker L, Picquet F, Petit J, Falempin M. Characterization of spindle afferents in rat soleus muscle using ramp-and-hold and sinusoidal stretches. J Neurophysiol. 2003;89(1):442–449.
- Fukaya T, Matsuo S, Iwata M, Yamanaka E, Tsuchida W, Asai Y, et al. Acute and chronic effects of static stretching at 100% versus 120% intensity on flexibility. Eur J Appl Physiol. 2021;121: 513–523.
- Golding LA, Myers CR, Sinning WE. Y’s Way to Physical Fitness: The Complete Guide to Fitness Testing and Instruction. 3rd ed. Chicago (IL): Human Kinetics; 1989. 202 p.
- Hatano G., Suzuki S., Matsuo S., Kataura S., Yokoi K., Fukaya T. Hamstring stiffness returns more rapidly after static stretching than range of motion, stretch tolerance, and isometric peak torque. Journal of Sport Rehabilitation 28, 325-331.
- Kellis E. Intra- and inter-muscular variations in hamstring architecture and mechanics and their implications for injury: A narrative review. Sports Med. 2018;48:2271–2283.
- Konrad A., Alizadeh S., Daneshjoo A., Anvar H.S., Graham A., Zahiri A., Goudini R., Edwards C., Scharf C., Behm G.D. Chronic effects of stretching on range of motion with consideration of potential moderating variables: A systematic review with meta-analysis. J. Sport Health Sci. 2023;13:186–194.
- Konrad A., Tilp M. The Time Course of Muscle-Tendon Unit Function and Structure Following Three Minutes of Static Stretching. J. Sports Sci. Med. 2020;19:52–58.
- Mackey AL, Kjaer M. Connective tissue regeneration in skeletal muscle after eccentric contraction-induced injury. J Appl Physiol(1985) 2016;122:533–540.
- Magnusson SP, Simonsen EB, Aagaard P, Soørensen H, Kjær M. A mechanism for altered flexibility in human skeletal muscle. J Physiol. 1996;497: 291–298.
- Matsuo S., Suzuki S., Iwata M., Banno Y., Asai Y., Tsuchida W., Inoue T. Acute effects of different stretching durations on passive torque, mobility and isometric muscle force. Journal of Strength and Conditioning Research 27(12), 3367-3376.
- Minkler S, Patterson P. The validity of the modified sit-and-reach test in college-age students. Res Q Exerc Sport. 1994;65(2):189–92.
- Neumann DA. Kinesiology of the hip: a focus on muscular actions. J Orthop Sports Phys Ther. 2010;40:82–94.
- Noorkõiv M, Nosaka K, Blazevich AJ. Neuromuscular adaptations associated with knee joint angle-specific force change. Med Sci Sports Exerc. 2014;46:1525–1537.
- Pincheira PA, Boswell MA, Franchi MV, Delp SL, Lichtwark GA. Biceps femoris long head sarcomere and fascicle length adaptations after 3 weeks of eccentric exercise training. J Sport Health Sci. 2022;11(1):43–49.
- Presland JD, Timmins RG, Bourne MN, Williams MD, Opar DA. The effect of Nordic hamstring exercise training volume on biceps femoris long head architectural adaptation. Scand J Med Sci Sports. 2018;28:1775–1783.
- Rikli RE, Jones CJ. Senior Fitness Test Manual. 2nd ed. Champaign (IL): Human Kinetics; 2013. 186 p.
- Takeuchi K., Nakamura M., Fukaya T., Konrad A., Mizuno T. Acute and Long-Term Effects of Static Stretching on Muscle-Tendon Unit Stiffness: A Systematic Review and Meta-Analysis. J. Sports Sci. Med. 2023;22:465–475.
- Takeuchi K, Nakamura M. The optimal duration of high-intensity static stretching in hamstrings. PLoS One. 2020;15: e0240181.
- The Cooper Institute. FitnessGram/ActivityGram Test Administration Manual. Updated 4th ed. Champaign (IL): Human Kinetics; 2013.142 p.
- Weijer VC, Gorniak GC. The effect of static stretch and warm-up exercise on hamstring length over the course of 24 hours. J Orthop Sports Phys Ther 2003;33(4):347–54.
- Woodley SJ, Mercer SR. Hamstring muscles: architecture and innervation. Cells Tissues Organs. 2005;179(3):125–141.
